2. The Form
Let’s continue with the form. This is a login form, the end goal being to get the user to login or signup. To offer encouragement we’ll keep the inputs to a minimum and present the user with some motivational language.
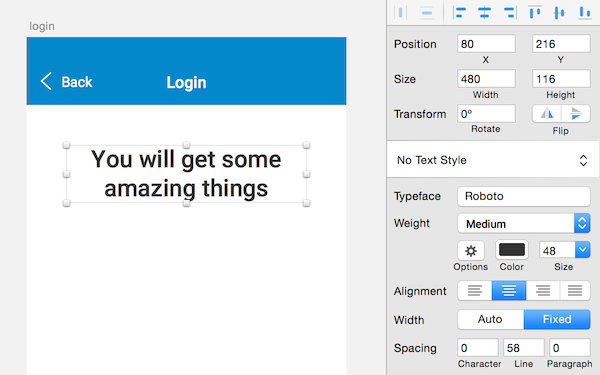
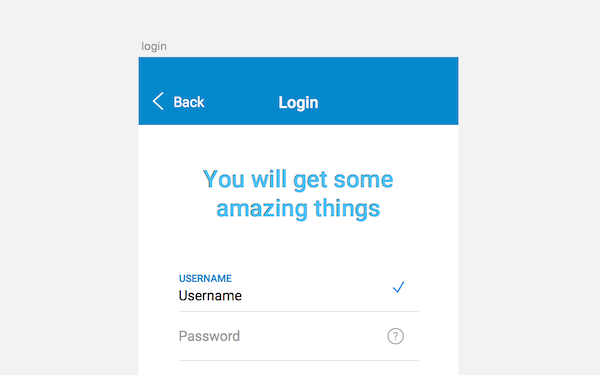
Type T then enter the catchphrase of your choice. Be sure to be concise, for me it’ll be You will get some amazing things, then edit the text properties to be:
Typeface : Roboto
Weight : Medium
Color : white
Font-size : 48
Alignment : Center
Width : auto
Line : 64
Now let’s place it. We want to apply whitespace to make it readable so I chose to put a 80px margin around the text. To do so edit the following parameters :
X : 80
Y : 216
Width : 480
Inputs
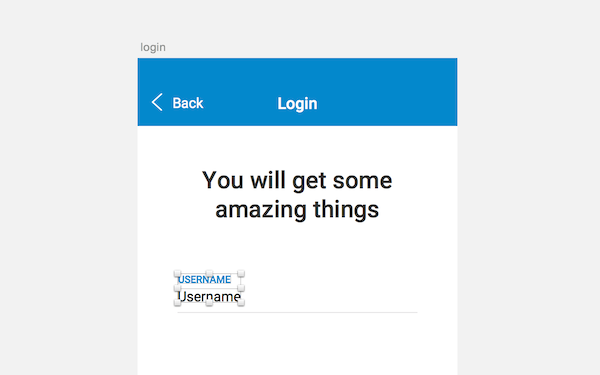
We have our catchphrase, now let’s add the core of our page: the inputs. Our inputs will demonstrate two states: empty and filled. Let’s start with the filled one : Press R and draw a rectangle, name it “input” and apply the following:
X : 80
Y : 412
Width : 480
Height : 96
Change the gray background to a white one in the Fills section, uncheck the borders and add a shadow with these properties:
H0 S0 B90 A100
X : 0
Y : 2
Blur : 0
Spread : 0
You should get something like this:

Note: To simplify the tutorial I’m giving you the exact distance for each layer. They each have a 80px margin. If you want to check the margin between your current layer and the others hold alt and drag your mouse over the other layers.
Now we’ll add a label for the input. Hit T then type “username” in uppercase, giving the text the following properties:
Typeface : Roboto
Weight : Medium
Color : H200, S100, B80
Font-size : 20
Alignment : Left
Width : auto
Line : 20
X : 80
Y : 431
Now for the content of the input. Hit T then type your name, giving the text properties these values:
Typeface : Roboto
Weight : Regular
Color : H0, S0, B0
Font-size : 28
Alignment : Left
Width : auto
Line : 28
X : 80
Y : 461
Then, select the two layers, align them to the left and add a 10px margin between them.
Validation
There is one last step to complete this filled input. Some kind of validation would help our users understand if they’ve filled in the details correctly, or they need to try again.
Let’s add this checkmark by clicking in Insert > Symbols > check icon then place it at
X : 510
Y : 450
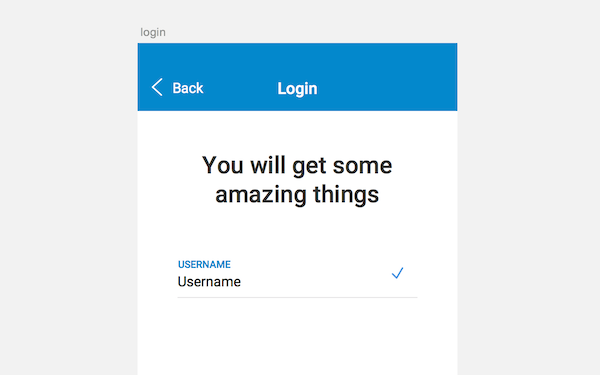
Select the input layer, the input content and the check icon folder, then group them and call the new folder input filled.
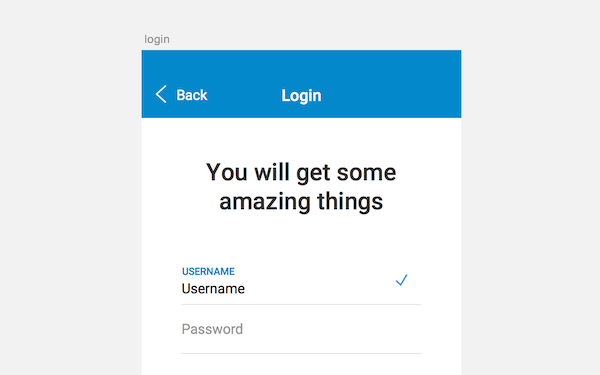
Let’s now add the empty input. Select the input filled folder, right-click it and press duplicate. Rename the folder input. Then move it down by 98px. Delete all the layers inside this folder except the one called input. Type T then write “Password” and add the following properties:
Typeface : Roboto
Weight : Regular
Color : H0, S0, B60
Font-size : 28
Alignment : Left
Width : auto
Line : 28
Then align your text layer vertically and to the left of the input layer like so :
Password Link
Now we’ll add a “forgot password” link. Click on Insert > Symbols > help icon and place it at:
X : 499
Y : 543
Move the help icon folder and text layer to the input folder and you’re done with the inputs!
19,584 total views, 8 views today